Sunday, March 28, 2010

Time to take a challenge break...


Today has definitely been a challenge.  Unexpected car repair AND the kitchen pipes, under the sink, decided to spring a leak and create a lake in my kitchen....sigh.  So, I decided to take a break from the hassels of life and create a card for a couple of blogs I follow.  And what better way to deal with challenges than do some challenges. 

The Pixie Cottage challenge #12 this week is all about circles...big, small, one, many...we decide...round and round we go.

Over on the Color Q blog, challenge #25 presents us with this week's color challenge: Celery, Banana, Turquoise, Chocolate Chip and White...why am I hungry all of a sudden.

Because I'm usually strapped for spare scrapping time, I thought, why not combine both challenges into one Thank You card for my dear Mom...who did not know that in sending me a care package earlier this week, it would arrive on this very day when I needed it most.  God bless Moms!!  So without any further chit chatter, here it is:


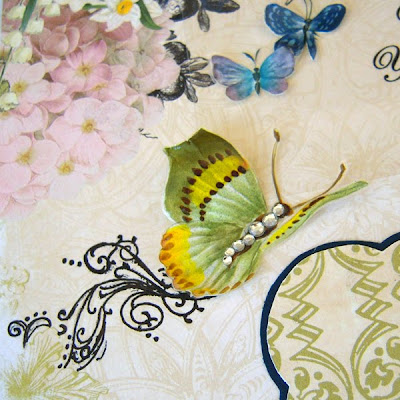
I think I have the circle thing down for Pixie Cottage.  I decided to pick up most of the color scheme, for the Color Q challenge, in my stamp as well as the card itself.  Here I have a close up of the Inkadinkadoo stamp that I've practiced, yet again, with my foray into Copic markers.  I embossed the white background using a Fiskars template and then lightly swiped the top with Shabby Shutters Distress Ink, to catch the raised dots.  The brown center circle has been glazed with Crackle Accents by Ranger.


Thanks again Mom!  Love you!

Friday, March 26, 2010

Mojo Monday with a little 365 Degrees

356 Degrees?  What am I talking about?  Why it's the new Pink Paislee line and Lil' Lambs Boutique has set up an awesome kit with these papers.  The Deluxe kit can be found here.  Of course, there was no way I was going to pass up the long card sketch from Mojo Monday this week. 


My favorite part of the sketch was the 3 panel series on the card.  I knew right off that I wanted to stamp a scene and split it across the 3 panels.  What perfect timing too...I received my box from Lil' Lambs Boutique with my set of Copic markers.  I might have done a little happy dance when no one was looking.  I kept hearing about these wonderments and I can honestly say, I may never go back to pencil coloring again.  They are that easy and fun to work with.  I definitely need some more technique work with them, but I'll keep practicing for sure!


I embossed the blue background field with my Cuttlebug embossing folder.  The edges are inked with Faded Blue Distress Ink and the White Bazzill Bling cardstock is inked around the edges with Spiced Marmalade Distress Ink.


I grabbed my Scalloped Oval Spellbinders to create the birthday tag.  After cutting and embossing the edge, I grabbed my Copic markers in 2 shades of Orange and colored the outer rim and outer edge.  Instant double matting!


After seeing the sketch this week at Mojo Monday, I knew I had to make this envelope for the card.  I saw this tutorial for long envelopes using only one entire 12x12 sheet of double sided paper.  Isn't this cool?  You can see the tutorial here. I used one of the sheets from the 365 Degree Collection that went quite nicely with the card above.  I edged the envelope flap with the gorgeous lace found in the Deluxe kit.


I cut out the flourish using the Quickutz Cookie Cutter 12" Border Die and the White Bazzill Bling Cardstock. The flourish is edged with a blue Copic marker and then spritzed with Frost Sheer Shimmer Spritz by Tsukineko (included in the Deluxe kit).


Finally I picked the gorgeous cream and orange Prima blossom from the kit, inked the edges with Faded Jeans Distress Ink and attached it to the point of the envelope flap.  I also spritzed it with the Frost Sheer Shimmer Spritz for a shinier look in the light.


Here you can see how nicely the card fits inside the envelope.


A perfect gift for my Mother-in-Law for her birthday. 

Tuesday, March 23, 2010

Some final layouts from my Prima Stash

I have a few layouts left from my Deluxe Pastiche Prima kit from Lil' Lambs Boutique.  I'm not sure I've enjoyed a line of paper more than this one.  It could be the crazy winter we've had here and I just love the bright, cheery colors.  Or it could be the incredible combination of Distressed Vintage to Victorian patterns that I liked so much.  Either way, I was thrilled to get so many projects done with it.

I entered a Paint and Distressing challenge on scrapbooking forum I participate in, and this is what became of that challenge.  The process was interesting to say the least.


We were called to use paint on our layouts somewhere and the twist was to distress it by using a hole punch.  I figured why not do both on my big circle in the corner.  I'm pretty sure I've forgotten how many layers of paint are on that circle, but I ended up with Gold paint, which I liked the best of all of them.  That's the fun thing with paints...you can just keep painting over it until you get what you like.  I did have a layer of crackle paint underneath which gives it that rough, distressed finish.  I then took my hole punch and punched, punched, punched all over.


For the scallop border, I cut out 11 circles and then fanned them around the outer edge of the circle.  After gluing the circle on top, I inked the scalloped border with Peeled Paint Distress Ink.


Finally, I blotted dots of Gold paint around the two opposing corners.  I've tried many things to make my dots but have found that a good old, non used pencil eraser does the best job for me. If you wash it off immediately after using, then it's ready for the next time you paint with it.


This next layout was a quick and simple one.  The background paper does most of the work for you.  I took my 5x7 photo and punched my matted border with the Arch Lattice Martha Stewart border punch. 


I border the bottom corner with the Prima flowers included in the kit. I did ink the edges of the big flower with Aged Mahagoney Distress Ink.  The ribbon, in the kit, I used in the upper corner of the photo to create a bow and at the bottom edge of the photo.  I used glue dots to create my ruffled border effect.


Prima has indeed become pretty slick with their marketing and packaging.  If you'll notice a lot of their packaging for embellishments come with this journal type background.  No need to throw that away.  Find a way to use it on your layout.  I took the packaging material from the brown, felt branches in the upper layout and cut out a small rectangle journaling spot for this layout.  3 of the edges were already cut with a ragged border, so I just cut the 4th edge to match.  I added a little Vintage Photo Distress Ink around the edges, handwrote my title and finished off with a rub-on butterfly.  I used my swivel Exacto knife to cut half the flower from the background paper, so I could slip my journaling spot in behind it.  Pop it up with a pop dot to give the flower dimension.


Ta-dah.  Easy as that.

Friday, March 19, 2010

Mojo Monday this week.

I was finishing up some projects this week using the Pastiche Deluxe kit from Lil' Lambs Boutique.  What do you do with the leftover scraps of paper from your kits?  Why you make cards of course.  If you're stumped for card ideas, Mojo Monday always has a new sketch every Monday.  You have a chance to see some great work from fellow artists and you get a handmade card to give to someone special.  You can see this week's sketch here and then my interpretation below.

I'm never one to just use a bunch of shapes on a card, although I love the look, my fingers just never seem to want to do that.  So I cut out some of the patterns and flowers to add to mine, just for something different. 


Everything but the solid cardstock is from the Deluxe Kit

Friday, March 12, 2010

Leave them in God's Hands

I know I'm not the only Mom out there that worries about their children.  What will they be like?  A Child of Character or a Wild Child?  Will they come to know their Saviour or will the seeds sown fall on dry ground?  These thoughts run through my head throughout the days, weeks and years.  I have to continually give the precious charges God has given me back to Him...usually daily. 

These thoughts provoked this layout of my two increasingly independent girls.  I used Websters Pages Life's Portrait line from Lil' Lambs Boutique.  Ah, this paper line makes me want to go plant a bunch of flowers.


I printed my journaling onto transparency paper and adhered with vellum adhesive.


I can't seem to do a layout without a border punch and this is no exception.  I used Martha Stewart's Double Loop Combo punch set for the photo mat.  The flower I made with wired ribbon.  It's a bit hard to explain without photos so I'll try to take some next week.  To make room for my photo, I sliced into the corner design with my swivel exacto knife.  There's no need to cut the whole corner out; just slice enough to slip your photo mat inside.


I've been on quite the butterfly bender lately.  I think it's the springy-ness of all the papers.  They want butterflies.  These are more of my rub on butterflies that are adhered to transparency paper, heated to curl and decorated with crystals for bodies.  The butterfly trails are made with the Flourish stamp from Stampers Anonymous.  I can't seem to do a layout without a Tim Holtz product either.


Have a wonderful weekend everyone.  Be sure to get some scrapping done!

Thursday, March 11, 2010

Caardvarks Photo Inspiration Challenge

This week I have been finishing up a few projects.  But I wanted to fit in this wonderful one from Caardvarks.  They come up with such great card challenges.  The challenge this time is to create a card based on what inspires you from this photo from Kids Pottery Barn.


I looked at this picture for quite a while, went away, came back and looked at it again.  About 2:00am last night I finally got inspired...maybe it was the fully caffienated Diet Coke my husband bought for me instead of my Caffiene free.  Well, whatever it was, it worked.  I worked mainly off the color scheme and then chose to go with butterflies instead of the bird and birdcage.


Here's the instructions on how I made this card:

The card is a 5x7 white textured card from AC Cardstock.  I used a Stamp by Inque Boutique, covered it with Gesso (which is a white based primer) and stamped my butterfly in the corner.  I then inked the edges of my card with Distress Ink (Shabby Shutters and Peeled Paint used here).  Finally I randomly spritzed with my Mini Mister mix (Coffee shop Glimmer Mist, 1 tiny scoop Gold Perfect Pearls).  After you are done inking and spritzing, wet a paper towel and lightly rub over your butterfly to remove the colored inks.  Gesso works as an ink resist.


Next, choose paper for your background piece.  I used Websters Pages Life's Portrait line.  Cut the paper slighltly smaller than 5x7 and then tear the edges all around.  In the corner with the butterfly, tear out a V shape, so the butterfly can peep through from underneath.  In the back edges and front edges with Walnut Stain Distress Ink. Roll up the edges slightly all the way around.


Cut out an oval shape and then cut out the middle section to make an oval ring.  You can emboss your ring with any type of embossing folder (Cuttlebug script folder used here).  Ink your ring any color you desire (Tea Dye and Vintage photo used here).  Glue your oval down on the background and then stamp your sentiment in the upper right middle section (Studio G stamp used here). 


Choose some type of floral paper and cut around the stems and flowers.  Use an exacto swivel knife to cut the smaller inside pieces.  More floral paper from the Life's Portrait collection was used here.  The fence is a border punch from Martha Stewart. Adhere these items to your card.  I suggest using pop dots for part of the floral work and the fence post. It adds nice dimension.


Finally finish off with a small flower in the corner of your V and some butterfly embellishments.  Items used here are a itty bitty Got Milk flower with a Basic Grey Opaline Pearl Center.  The butterfly is a rub-on that I adhered to transparency paper, cut out and then heated up to curl a bit.  It's pop dotted onto the card and then Opaline Pearl Butterfly trails to finish.


Now it's your turn!  If you have any questions about technique or product, just let me know in the comments section.

Monday, March 8, 2010

Bouncing Baby Buggies

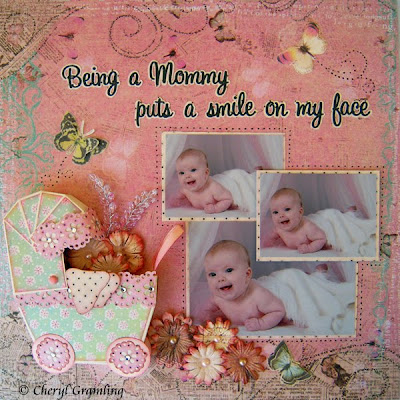
I'm a paper piecer.  I have loved it and always will.  Due to lack of time, I don't get to do it as often as I used too.  But now, I've found a new timesaver and still just as fun.  Lauren, from My Time Made Easy has come up with the cutest templates.  They're so versatile and easy to use.  I just love them!  I snagged up her Baby Buggy which was just released this month for this layout of my youngest.  I loved these baby pictures of her and my Swirlydoos kit for March arrived with the perfect papers.  The kit this month has the beautiful Flight of Fancy Prima papers and oh, they are delish.


Lauren's template is actually for a full Baby Buggy but I wanted to put it on my layout instead of free standing.  Easy enough.  After making the template I cut it in half and trimmed it down to about 1/2" wide and folded in about 1/4" so I would have tabs to glue it to my layout.  Isn't it too cute?  I decorated it with the Prima papers and used the Doily Lace Trim punch from Martha Stewart for the edges.


I picked up a neat tip from Lisa at Swirlydoos.  I scanned the butterflies off of one of the Prima patterned papers, so I would have them to print and use as embellishments instead of cutting up the patterned paper.  I imported the photos into a word document and made 2 copies of each butterfly.  I sized one a touch smaller than the other, printed out on cardstock and cut them out.  I glued the smaller butterfly body on top of the bigger one and bent the wings up to give it dimension.


Finally, I doodled a black dot outline around the photos and doodled some dot flourishes around the butterflies.  Oh and just because you went crazy and bought a MILLION of the baby photos you had done, doesn't mean they need to go to waste.  Using 3 of the same photo in different sizes and arrangement is a great way to use up the leftover photos.


Happy Monday to everyone!

Thursday, March 4, 2010

On the Streets of Paris

Okay, they're not really on the streets of Paris, but these studio photos of the girls remind me of a Paris street every time I see them.  I waited a long time to scrap these because there didn't seem to be the perfect papers until I received my Prima Pastiche Deluxe Kit from Lil' Lambs Boutique.  Oh my word, the colors in this collection are just stunning.  I have a couple more layouts coming soon using this kit, but first onto Paris!!


Everything on the layout was included in the Deluxe kit except for the stamped collage below.  I've had this Paris stamp forever waiting to use and don't you know, I dug into my stamp stash and pulled this baby out for this layout.  The collage is a technique I found on Split Coast Stampers. I'll put up some tutorials soon of the collage and the paper flowers.  I wish I could tell you who made the Paris Collage stamp but alas, it's an unmounted stamp that I've had for a while and I cannot locate the maker online.  If you know which company made this stamp, please leave me a note in the comment section and I'll edit the post to credit the stamp maker.


The French title is translated "My Cute Babies" and the sub title along the left side of the photo is translated "on the streets of Paris."  This paper screams for the lovely French language, n'est-ce pas?  I used my tiny scalloped deco scissors to create the mat borders and then dotted them with my white pen from Inkssentials.


I used an exacto knife to cut a slit into the border along the bottom, so I could slip my photo part way underneath.


And finally here's a close up of some the wonderful Prima Pearls/Crystal bling and Prima pebbles included in the kit.  I made the paper flowers using a tutorial from Split Coast Stampers and some of the paper from the Kit. 


Happy Scrapping and....au revoir mes amis!