Wednesday, January 27, 2010

Need ideas? Work from a sketch...


What do you do when you're stuck in a rut or have no scrapping mojo? I, personally, don't like to stay in those situations long, because it's very easy to just stop. Some things I like to do: run through my list of blogs to see if anyone has come up with some new techniques to try, filter through my scrapping magazines to try a different style of layout or I look through sketches of some of my favorite artists. Every month at Swirlydoos, there is a sketch of the month challenge. The one below is from Beggahuna made specifically for Swirlydoos. She creates many beautiful sketches which you can find here.


Here is my take on her sketch using the January Swirlydoos kit. Sketches can be followed closely, loosely, whatever it means to you. You can flip it, rotate it or just take certain elements. Sketches are used to engage your creative process and interpret it how it works for you.


We received a gorgeous die cut snowflake paper in our kit this month, which you can see in the picture below. I decided, to mask it for my background, since I wanted the paper for a different layout. I used 3 colors of blue Distress Ink (Faded Jeans, Broken China, Weathered Wood) to create my mask. The die cut paper has a glossy, embossed side and a plain side. I flipped the paper, plain side up, and used the makeup sponge to dab, dab, dab (do not rub on) the ink onto my background paper. Below you can see where I sponged on the Weathered Wood color. Do the three colors randomly over the section you are trying to mask and then lift the mask. With this type of die cut, if you rub the ink on, you have a good chance of ripping the die cut paper.


Here you can see the outcome. I did sponge on more color all the way to the edges of the background paper to give some continuity. Here's a fun little trick from Tim Holtz: before your Distress Ink dries, spritz some water onto your fingers and then flick your fingers at your background paper. It makes little water dots that look like snow falling.


I created the 3 vertical strips using the Doily Lace Trim Punch by Martha Stewart and the Double Loop punch to create the photo mat. After cutting my purple circle and inking the edges, I stamped the circle with a Manuscript stamp by Hero Arts. I like the Prima pearls along the edge of the circle too...gives it a nice romantic touch I think.


This gorgeous butterfly was included in the kit. I created a purple shadowed background for it and then used an Inkadinkadoo Snowflake flourish for the Butterfly trails.


The snowflake border below is a woodcut border included in the kit. I painted it with Pickett Fence Crackle Paint.


And finally lots and lots of flowers, along with some snowflakes. I inked a lot of my white flowers with coordinating colors of blue and purple. The centers are created with a dab of glue and micro beads. Be prepared for them to get everywhere.....


And there is my take on the sketch for this month. I've already seen the one for February and it's just as pretty. Can't wait to work with it.

Thursday, January 21, 2010

Caardvarks Challenge for Lil' Lambs Boutique

Attention all my Cardmaking friends: Here's a double bonus for you: a chance to win $25 gift certificate from Lil' Lambs Boutique and a chance to get those Valentine cards done early. We are hosting a heart challenge over at Caardvarks. You can find all the challenge details here.


I wanted to jump into the action and used the Bo Bunny Love Bandit Deluxe Kit , seen below, to make 3 cards for my dear husband and two girls.

I used the faux stitching on dear hubby's card. I took some of the green trim from the kit and pleated it in a little circle, tacked down the middle with some thread and used it for the center layer of my flower.


I cut one of the little premade tag sentiments from the sheet of Bo Bunny tags to use here and then picked up my Martha Stewart punches for the bottom. I used the Deep Edge Lattice heart punch (which is beyond cool) and the Doily Lace Edge punch. The center of flower is one of beautiful glittery brads from the kit.


And finally another tag card used here from the Bo Bunny tag sheet, some more faux stitching and green trim from the kit. The big glazed brad in the flower section is also from the kit. I still have plenty left over from the kit to make a layout, which you'll get to see later and a treat bag.


Get on the move...you have until February 1st to submit your entries.

Monday, January 18, 2010

All is Calm.....well not exactly


My layout states A Calm Winter's Night but our house is anything but calm. With two young kiddos, it stays pretty hopping. However, when I need a moment's peace, I can come and gander at my serene snowy photos from our last big snowstorm. I wasn't sure how the night pictures would turn out but I really like them.


And so the beautiful papers keep on coming and this is not the end...oh no. This again from the January Swirlydoos kit. I think I still have 2-3 more layouts sketched out using this kit. Good thing I have a couple more weeks in January. My next kit will be here before I know it.


I stiched lines down the top and added gems at the bottom to represent icicles. The flourishes and snowflakes were cut from the Home Accents Cricut cartridge. I inked the them both with shades of Faded Jeans, Aged Mahogany and/or Antique Linen.


Quick Tip/Trick:
1. I set up a 6x6" piece of cream paper on my Circut mat and then set all my snowflakes to cut.
2. Before I removed them from the Cricut mat, I sponged on all my inks. This helps with the tiny details not ripping because they're still stuck to the mat.
3. I used the snowflake stamp from Tim Holtz and some little ones from Inkadinkadoo and stamped over top of the cut snowflakes.
4. Then, I lifted all of them off the mat, inked around the edges with Walnut Stain distress ink and assembled.


I also used the trick above to ink my flourishes.


The purple paper is from Creative Imaginations. I tore around the edges and then inked with Vintage Photo and Walnut Stain distress inks. The edges of the photo mats are also inked with Walnut Stain.


At the top I ripped away enough of one corner so I could peep a snowflake through. It's a little hard to tell from the photo but I inked the snowflake with Vintage Photo distress ink and then poured Sterling Silver embossing powder over top. Distress ink picks up embossing powder in some areas but not all so the heated effect is pretty neat looking...kind of sprayed on. I then added Glossy Accents over top, let dry and then put on white marks with my white pen.


For the doily, I cut the middle section out and then set up two Mini Misters:

Mister #1: 2/3 water, 10 drops Caramel and 2 drops Latte Alcohol ink, 1 pea size scoop of White Perfect pearls. Shake well.
Mister #2: 2/3 water, 10 drops Cranberry and 2 drops Egg Plant Alcohol ink, 1 pea size scoop of Heirloom Gold Perfect Pearls. Shake well.

On my Craft Sheet, I sprayed randomly on the doily with Mister #1 and then filled in the spots with Mister #2. I dried the entire doily thoroughly with my Heat Tool and then remisted again. The second round enhanced/darkened the colors. After drying again I was satisfied with my colors but additional rounds of misting/drying can be done to darken the colors to desired effect. After the doily was dry, I inked around the outer/inner edges with Vintage Photo distress ink to set it apart from the background paper.


Are you thankful this Monday? Find one thing to be truly grateful for and you'll find your day suddenly is a bit brighter.

Saturday, January 16, 2010

Daddy is the Hero


I finally had the opportunity to scrap some of our blizzard pictures. Now I know, 22" is nothing for some but it's the most we've had in quite a long time. The last big one I remember was 1996. Back then, I didn't have a handsome, strapping husband to help shovel the snow. This time, I did and boy did we pamper him with hot chocolate, a yummy meal (and quite possibly a few beers) for all the work he did. Wouldn't you know all 3 snow blowers on our street went down and so it was each neighbor for themselves. And yet, I still observed the caring quality on our street, that I love so much. Neighbor helping neighbor to finish off their driveway or sidewalk.


So below is more goodies from my Swirlydoos kit. The top left picture was just halfway through the storm. You should have seen how tall our vehicles looked the next day. The second picture - 20 something degrees...oh man it was cold.


Add insult to injury....we have a double driveway. Every other day of the year, it's just fabulous. In 22 inches of snow, it can cause quite a few aches and pains.


The letters above and the purple snowflakes strip below are from the Bo Bunny Snow Serenade sticker sheet. I have never been one to just put stickers directly on my layout, because I like to move things around until I get the placement just right. The letters are easy because I usually back my title letters in an opposing color (light - white in this instance) so they are easily seen on the layout. The other elements I put on transparency paper. Typically, I will cut carefully around all the edges but as you can see these have a lot of detail. Since it is transparency, I cut close to the edges. You can see it along the bottom in the photograph below but once you get your layout into your photo album and page protector, they disappear. Also notice, I mangaged to sneek in a Martha Stewart border punch....the partial snowflake strip along the bottom.


The icicle border at the top was my favorite part of this layout. Tattered Angels sells packages of Glimmer Screens, which are in effect masks for their sprays. However, they can also make good stencils to create your own shapes on paper. I took a plain 12x12 sheet of purple paper and on the back lay down the Icicle Glimmer Screen and traced around the whole thing. Now, this Glimmer Screen is not 12 inches long, so I placed it at the end of the one I finished tracing at a similar point and continued tracing. It took about 2 1/2 tracings to cover the full 12 inches. Once you cut it out, flip it over and you can never tell that it wasn't one long border to begin with.


I inked it with Dusty Concord and Broken China distress inks and then for the fun part. I used a paint brush to spread glue on the icicle border and then liberally sprinkled Martha Stewarts Crystal Coarse Glitter all over it. The glitter is clear so it still brings out the color beneath while capturing the sparkle from the light.


More to come soon....

Wednesday, January 13, 2010

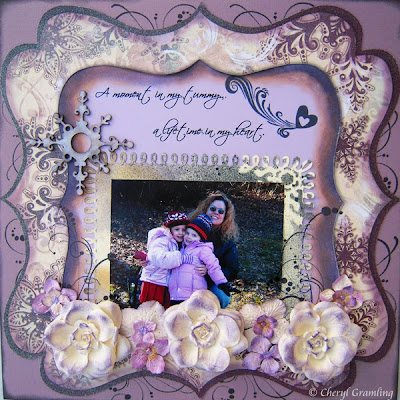
Hanging with my girls


As a Mom and a Scrapper, it's not often that I get to be in front of the camera. And to get a picture of myself with both my girls is a real treat...even if we were freezing. I may have to make that a goal this year...to get in front of the camera more. Someday, when my grandkids are looking through my scrapbooks, I want them to know that Grandma was around "in those days."


This month you'll be seeing a few layouts using the gorgeous Bo Bunny Snowy Serenade line. My January kit from Swirlydoos was jam packed with wintery goodness and I can't wait to do some more layouts. I used the gorgeous Die Cut sheet from the kit and cut the center portion out to be used on another layout.


I wanted to show you a close up of the quote. It's such a great one and so true. I picked it up from LilAngelzMom in a Quote Challenge I've entered. The snowflake is a woodcut snowflake that I inked with Dusty Concord distress ink and then brushed with Perfect Pearls (Pearl color).


Check out the shimmer on this die cut paper. Glittered edges and shimmery embossing everywhere. After cutting out the center portion of the Die Cut sheet, I used Tea Dye and Dusty Concord Distress Inks to create an internal border. I also used Dusty Concord to sponge some color onto the White Prima flowers and edges of the Hydrangea Flowers.


The inner photo mat was created using Martha Stewart's Loop Combo punch set. I used a Tattered Angels Snowflake Glimmer Screen in the corner and then spritzed on Raven Glimmer Mist. The heart flourish is from Autumn Leaves and the flourishes around the photo are from Inkadinkadoo.


Before gluing down the Die Cut sheet, I stamped on the background cardstock with Inkadinkadoo flourishes, so they would peep out from behind.


Remember, make an effort to step out in front of the camera this year. You owe it to your descendents.

Tuesday, January 12, 2010

My take on Basic Grey's Page of the Month


Did you know that Basic Grey creates a Page of the Month kit, which Lil' Lambs Boutique offers to their customers. Below is the December Page of the Month kit, available here. Kellie Goree creates a sample layout that you can follow using current Basic Grey papers and embellies. While her creations are quite beautiful, we on the design team for LLB thought it would be neat to offer up some additional alternatives for the customers using the exact same kit.


Below, I have created 2 different layouts using only materials from the kit except for Distress Ink and Stickles.

First up are my two cuties enjoying everything there is in life...and there's usually nothing better than our adventure walks. They always have a great time collecting items together. This time...pinecones! We used them for a table centerpiece over the Christmas season. They look like they don't have a care in the world, don't they?

I used my Double Loop Martha Stewart border combo punch to create an inner workspace and mat for my photo. I love it!


Did you know you could make Tim Holtz's grunge flowers with regular pattern paper as well? Yes, you can!! I love how these roses came out with the 2 different papers.


Scrapping TIP/TRICK: Here's a scrapping tip for those of you purchasing the Around the Page border punch combos (ie. Corner punch and Border punch like the double loop below). In the package they provide measurements for paper sizes that work well with the Around the Page punches. For any size you pick, here is what I found typically works best for punching the actual paper.

Instructions for one side (just repeat on all four)

1. Punch the corners first.
2. Use the innermost punch marker on your tool for punching the first side border punch. Do this to both sides first.
3. Continue on either side to punch, now using the outermost punch marker, until you are ready to punch your last side punch (ie. your 2 sides have now almost met together). I have found that the measurements, whether slightly off or just my punching skills, are not quite exact. So for the last side punch, I use the outermost marker on BOTH sides of the tool and attempt to get as close as I can to an exact punch. When you divide the minute overage to both sides of the tool, it really comes out as if you have perfectly punched the whole border.

(Let me know if you'd like to see this with pictures, in the comment section below. I didn't think about taking pictures as I was punching.)


Since I was working with the letters provided in the kit, I outlined them in black so I could set them against a similar color background and still read the title.


I think I might have gone a touch punch crazy on my second layout! This is my youngest in all her dress up finery working it for the camera. The left hand edge is the Deep Edge Daisy shell punch. On the right side are the Deco Fan Edge punch and the Doily Lace Trim punch.


There are plenty of chipboard designs available in this kit. I made a virtual garden of flowers in the upper part of my layout. Small tip: Even though they have a sticky back, I would strongly advise gluing them down anyway.


Here's a closer picture of some of the punch work. I think I might be as addicted to these as Tim Holtz products...oh dear.


Happy Scrapping everyone!!

Tuesday, January 5, 2010

Happy New Year and Happy Birthday


Happy New Year everyone. My wish for you is that your 2010 is Blessed beyond measure. I also want to put a shout out to my best friend, Tina who is celebrating the big 4-0 today. Happy, Happy Birthday. And since we're talking birthdays, I decided to do a layout of my oldest's 5th birthday. Sort of fitting, I think.


I used Basic Grey's Nook & Pantry line from Lil' Lambs Boutique. Not only are these great papers for recipe cards, they do a great job for a birthday page too. The cupcakes look mighty yummy.


You'll never believe what I fished out of the bottom of one of my scrap drawers. Shape scissors!! Yes, I know...those ancient tools but hopefully you all didn't throw them out with the last yard sale. With the mania of new punch tools coming out, some of those dandy little scissors can come in quite handy. I used the tiny scallop scissors to create the mats for all the photos and then used my punch tool to create the little holes. I was looking at some layouts from a friend's gallery and I noticed that she popped up her photos and I loved the look so I tried it here.


I wanted a stark color to separate the top half and bottom half of my layout but didn't want to use any more patterned paper, so I found this maroon ribbon that accents the paper.


I also used Worn Lipstick and Aged Mahogany Distress Ink around the edges to soften the look of the darker ribbon along the middle. The big 5 is grunge board by Tim Holtz that I colored with Broken China distress ink and then spritzed with my Blue Mister (has Denim glimmer mist, Stream Alcohol Ink and Blue Patina Perfect pearls mixed together). Alas the shimmer is indeed hard to photograph but it's there.


Coming up this month is LOTS of goodies. I do hope I have time to complete them all. I have some more Basic Grey, lots of Bo Bunny and possibly some Webster's Pages projects. So stay tuned....