Wednesday, June 30, 2010

Martial Arts World on a collision course with the Scrapping World...

....And it's a beautiful thing.  My sweet "Tae Kwon Do-Dos" have earned their first belt and boy, were they excited.   I'd officially like to note that they've been training as long as that Ralph Macchio Karate Kid trained and gosh, would you believe they just couldn't get that tournament winning fly kick down??  I don't get it.  Must be because I didn't have them "Wax On...Wax Off" or "paint the fence...up... down...up...down... side...side."  Ah, the 80's were a great decade of memorable movies.  Anyway, I digress. 


Back to the present.  At my girls' tender young age, they are not yet embarrassed  by Mom "Scrapacizing" everything.  So when they got these cookie cutter Tae Kwon Do back packs with all their gear...that looks like every other kid's cookie cutter back pack...Scrapping Mommy got to work.  No way were my kids going to have a generic luggage tag attached to the top.  I picked up my pals, Mr. Holtz and Ms. Copic and created my version of an ID tag (colors chosen by the TK Do-Dos, of course).  

I wanted to capture the flavor of Tae Kwon Do along with our spiritual beliefs.  We chose II Timothy 4:7 as their motto verse to strive for: "I have fought the good fight; I have finished the race; I have kept the faith."  I picked the beautiful Mugunghwa (the Official Korean flower) to draw and fill in with my Copic markers for the corner of the tag.  And then of course, their names on the back to complete. 


So there you have it...East meets West. 

Monday, June 28, 2010

JustRite Sketch Challenge #024

Ah, it feels good to get back in the groove again.  If you ever hit a slump, I highly recommend sketch challenges.  They provide just enough boost to get your creative burners flowing again.  This week, at JustRite, we were given the following sketch challenge with the requirement to use an Americana color scheme.


Fitting that I just received 2 batches of JustRite stamps from Lil' Lambs Boutique.  I decided to rotate the sketch for my card.  The stamp is from the Seeds of Kindness collection.  I created the white borders using the Doily Lace Trim Martha Stewart punch.


I decided to create my own patterned paper for the red strip.  Here's a quick tutorial on creating your own patterned paper. First, cut out a small flower using a die machine or stencil (Tattered Florals Alterations Die used here).  Take a blank ink pen and trace around the flower onto the red paper strip.  Set white flower randomly about when tracing.


Next, take a white opaque pen (Inkssentials used here) and draw white dots around the inner edge of your traced flowers.  It's as simple as that.  You now have your own patterned paper.


If you get a chance, stop by JustRite and join the challenge.  You have until Friday.


Paper: AC Cardstock
Stamp: JustRite - Seeds of Kindness collection
Dies: Tattered Floral Alterations Die by Sizzix, Oval and Scalloped Oval Nestabilities by Spellbinders
Punch: Doily Lace Trim by Martha Stewart
Inkssentials Opaque Pen
Stickles by Ranger Ink: Christmas Red

Saturday, June 26, 2010

Is anyone else broke this month?

You know, I always think, next year, surely there won't be THAT many people graduating, but sure enough, we always happen to know 3 or 4.  However, I must say, it's money well spent.  Where else in the year of bills, birthdays and Christmas, can you say, I've invested in someone's future. 


So, off to the fun!  I just received the already sold out Tim Holtz Lost & Found Paper Stack from Lil' Lambs Boutique and oh, what fun it's been to play with.  He is a creative genius.  I have quite the pot pourri of "Tim stuff" in this post.


 For Card #1, to create the background, stamp your card with a big Harlequin stamp, using Embossing Ink.  Emboss with Clear Embossing powder and then ink around the edges with your favorite Distress Inks.  Don't worry about covering up your embossed design, because a damp paper towel will wipe it clean, leaving the Distress Ink in the crannies.  You can see the process clearly in the lower right corner of the card.  Cut out the calendar 6x6 sheet (Lost & Found paper stack) into 3 strips, rough up the edges and ink with Walnut Stain Distress Ink.  Adhere in a descending fan onto the your card background.


Cut out an oval and print on your sentiment. Adhere with pop dots for dimension.  Use punches or dies to create a 2 layer flower with a light and dark layer (Tattered Floral Alterations die used here) and a flourish (Sizzlet die used here).  Before popping out your flourish from the paper, ink it with Distress Ink. It's easier to ink flourishes and swirls before popping them out.  Layer the light flower behind the dark to separate the background from the top flower layer.  Curl the top edges of your flower and add the center.  Here I used a glass ornament fragment with the Graduating Year glued on underneath and a charm attached to the top.  Adhere everything and your done.


Card: Die Cuts With a View
Stamp: Harlequin Stamp by Fiskars
Paper: Tim Holtz Lost & Found Paper Stack
Dies: Alterations and Sizzlets by Sizzix, Nestabilities by Spellbinders

Flower Center: Glass Ornament Fragments by Tim Holtz Idea-Ology
Ranger Ink Distress Ink - various colors
Pop Dots, Glossy Accents, Charms


The bottom edge of card #2 is created by using an Alterations On The Edge die by SizzixRun your card through your die cut machine and two pieces of paper, one solid color and one patterned (Lost & Found Stack used here).  Adhere the solid color on your card along the bottom edge.  Then add the patterned paper on top about 1/2" higher.  Write the Graduating Year in the lower right side.  Cut out a scalloped rectangle, ink the edges (Walnut Stain used here) and add your sentiment. Do not adhere the sentiment yet.


Cut out the Extra Large and Medium flower from the Tattered Florals Alterations die in two colors and a small punched flower.  If using solid colored paper, set a stenciling template or mask on top of the large flower (Spellbinders Flower Impressabilities used here), and ink lightly with Walnut Stain ink.  Add the mask/stencil to the second flower and ink with a coordinating color (Broken China used here).  Cut out a flourish or swirl and ink the edges with Walnut Stain Distress Ink.  Layer and adhere your items as follows: Large flower, flourish, scalloped rectangle, medium flower, small flower.  Add a center for your flower (Gold Liquid Pearls used here). 


Card: Die Cuts With a View
Paper: Tim Holtz Lost & Found Paper Stack
Dies: Alterations On the Edge by Sizzix, Nestabilities by Spellbinders, Flourish by Quickutz

Stencil: Spellbinders Floral Impressabilities
Ranger Ink Distress Ink - various colors
Ranger Ink Liquid Pearls: Gold
Pop Dots, Glossy Accents,


For card #3, cut your background paper to the size of your card.  Rip a small edge away around the entire piece, and then rip off one corner.  Ink the edges with Distress Ink (Walnut Stain used here).  Adhere to your card. The flourish is from the Prima Say It in Pearls collection.  If you don't have the right color, then you can change the flourish using Alcohol Inks by Ranger.  The flourish below was light pink.  I sponged on Red Pepper Alcohol Ink to create the red color instead.  You can add as many layers of Alcohol Ink you would like, just remember to let each layer dry first. Simply blowing on the alcohol ink will dry it.  Adhere your flourish to the card.


Cut out an oval die cut and print sentiment.  Ink the edges (Antique Linen used here) and pop dot the sentiment to your card.  Add coordinating punched flowers using solid color paper. Layer and adhere your flowers and add flower details (Liquid Pearls used for the center).  Finally, add the year in the upper corner using rub-ons.


Card: Die Cuts With a View
Paper: Tim Holtz Lost & Found Paper Stack
Flowers: Stacked Punches by Family Treasures, Prima
Flouish: Say It in Pearls by Prima
Rub Ons: Autumn Leaves


Ranger Ink Distress Ink - various colors
Ranger Ink Alcohol Inks - Red Pepper
Ranger Ink Liquid Pearls: Ruby Red

Glossy Accents,

Saturday, June 19, 2010

Some people are just made for each other

I received the Basic Grey Cappella Mini Album Kit from Lil' Lambs Boutique and I went in search of photos to go with it.  Unfortunately, I had just finished a wedding album as a gift and my wedding photos were long done...so what to do...what to do.   I just happened to remember seeing a friend's wedding photos that she posted to Facebook and thought how fun it would be to use her photos for the album and then give them the finished product as a wedding gift...albeit a touch late.  Their photos struck me because you can literally tell how in love they are with each other...not to mention they're so cute when they post on Facebook too.  Anyway, let's head off to the races because this turned out not to be so mini an album afterall.


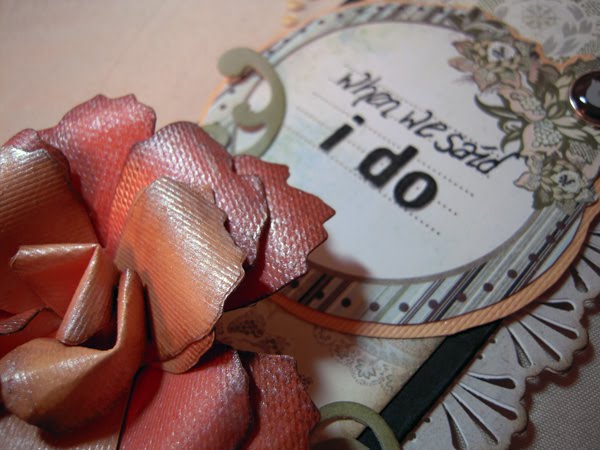
The Cappella line is a rather subdued line with cream, light yellows, pale pinks and greys.  This makes it perfect to accent with any color cardstock that picks up the colors used in the wedding. 


I created my only real big 3D embellishment, making the cardstock rose, using Tim Holtz's tutorial here.


 The flourish at the bottom is created using liquid pearls.  You can see my tutorial here.


All edges of the mini album were punched using Martha Stewart border punches. I used the same border punch for the front and back of each individual page and then glued the punched edges together. I opted for only 2 sides because of the unusal size of the tag album, which didn't fit the standard around the page measurements for the border punches.


The kit comes with a tremendous amount of tags that can be cut up to use as embellishments.


It also came with complete instructions for finishing each page.  You can opt to follow them or throw caution to the wind along with the directions and do your own thing.  Their version put mini tags in between the bigger pages and I didn't care for the look of the mini tag covering part of the photo, so I opted to pop up some of the photographs and create a tag insert instead.


Don't be afraid to run over the edges a bit when you add embellishments.  That's half the fun with mini albums is chocking them full of embellishments.  If you do have one hang over the edge, such as a tag, ink the back of it with a neutral/dark color and it will be less obvious than stark white (see photo above for back of tag sticking out).


These flowers are from the new Tim Holtz Alteration dies...oh my, I love his stuff! I stamped the background, of the big flower, with a stamp from his Stamper's Anonymous collection.


What's a project without butterlies?  Here, I transfered a rub-on buttefly onto transparency paper.  After cutting out around the edges of the butterfly, I heated it with a heat gun.  This curls up the wings and lifts it off the paper, when glued down.


For the tag at the bottom, I cut out an additional heart shape and the internal wings, inked the edges and then popped them up with pop dots for a dimensional tag.


This is absolutely my favorite photo of all of them.  All the wedding photos used in the album are courtesy of the very talented Julie Dreelin, from Beach Productions.


Here are the tags I inserted throughout the album for the Bride to complete of her treasured day.


And finally....the end.  Understated...but hey, something should be.


And there you have it!  Congratulations Beth & George.  May you have many incredible years of happiness, blessed by the Lord!


Thursday, June 17, 2010

Sneak Peek into the Case of the Missing Mojo

So if you have been following me at all you know Spring was not the easiest season for me and it was also the season that my creative mojo was stolen, swiped, hijacked, or just decided to take a vacation.  Anyway, it appears to have decided to revisit my humble scraproom.  Last night, I was a flurry of scrapping activity and it felt so good to wake up with Vintage Photo ink stained fingers and a patch of Glossy Accents stuck to my thumb.  Summer is here and I'm a scrappy girl again.  

I didn't finish my project last night because...well, I'm just slow or fussy or picky or don't know when to stop...take your pick.  But I did want to post some sneak peeks for you all of a project I'm desparately hoping to finish in the next couple days.  So...enjoy!!


I can't wait to show you the rest.

Tuesday, June 1, 2010

A few things....

My dear crafty friends...I apologize for the big time lapse since my last post.  We have had mutlitple family situations that have frankly ripped my desire to be creative.  Although, we are all healthy now, it has certainly been a trying last 6 weeks.

I did manage to get a few projects completed in the last 6 weeks and they are below.  They are all made from the wonderful kits I receive from Lil' Lambs Boutique.  I am hoping to light a new creative fire in my system soon so I can get back to my scrappy therapy.  : )

This interesting layout used the Pink Paislee Bayberry Deluxe Kit.  If you have toddlers, then you can understand that digital cameras are a must when trying to take their picture.  Smile...Look Up...Together...Over here...don't blink...it never ends.


Edges of the photo mat are Martha Stewart border punches.


Next up is some fun with the Basic Grey Green at Heart Class Kit. This kit contains a great 2 page layout with instructions, but here is my take using half of the products if you like to do single page layouts.


I created the circle by pleating strips of the striped patterned paper and then gluing around the back edges of a pre-cut circle.  


Finally, we have a quickie layout using the 365 Degree Deluxe Kit with Pink Paislee papers.


I created a back pattern for the photo mat using the white side of some old patterned paper.  I created the frame for my pictures and then layed the pictures out on top.  Remember to leave a bit of space in between the photos.  After adhering them, cut the edges down to match your frame.  You can cut additional strips for top and bottom if you desire.


And that's it folks....not much but at least it's a post.

Hopefully, I'll jump back in the saddle again soon.